Pages

Showing posts with label Ashlee. Show all posts

Monday, May 9, 2011

Tis the Season... Strawberry Season!

It is Strawberry season here in Virginia and now is the time when all the you-pick farms are open. I found a farm close to us using PickYourOwn.org, check it out and see what's growing near you.

We picked A LOT... four gallons. Each gallon bucket was $8.50 and when full weighed about 5.5 lbs. It was a ton of fruit. I had plans for all this fruit, plans that involved pretty little jars, sugar, and pectin. You guessed it... JAM!

This was my first time making jam, so I went the easy route and made freezer jam. For 5.5 lbs of strawberries I used 3 cups of sugar and 8 tablespoons of instant pectin. This filled 11 8-ounce jars (be sure to use freezer-safe jars).

The instructions on the jar of pectin (I used Ball Instant Pectin and used the recipe on the inside of the label) said to use a potato masher to prepare the strawberries. This was a bad idea.

So I gave the mixer a shot. Also a bad (and messy) idea.

Finally I moved to the food processor and the jam was well on its way. This is when I learned something about hulling a strawberry.

It's not enough to cut the top off, you have to cut in to remove all the white part (the hull... duh). If you don't hull them properly, you'll be left with nice jam with weird white things throughout that don't taste like anything good.

Once the strawberries are ready (5.5 lbs made 7.5 cups of processed strawberries), mix the sugar and pectin in a large bowl. To this, add the strawberries and stir for 3 minutes. Once thoroughly mixed, ladle into jars, place lids, and let it sit for 30 minutes before putting it in the freezer (good for 1 year) or refrigerator (good for 3 weeks).

This stuff is good. So good that we ate 3 jars in 24 hours. I ended up making more with the remaining strawberries and we should be set for a good while. I'm very excited to now have a freezer stocked of delicious, homemade organic jam for very little out of pocket.

Anthony used some of our jam to make my Mother's Day breakfast. He made my favorite... my mom's strawberry french toast. Here's the recipe:

Strawberry French Toast

Ingredients:
Strawberry preserves
1 egg
1/3 c milk
1 1/2 T sugar
1/4 t vanilla
2 T butter
Powdered sugar
Fresh strawberries, sliced
French or Italian bread, cut into 1" slices

Directions:
Mix egg, milk, vanilla, and sugar in shallow bowl. Melt butter in pan on medium or medium-high heat. Dip bread in egg mixture and turn to coat. Put on skillet and brown lightly on both sides. Garnish with preserves and strawberries and dust with sugar.

Monday, April 18, 2011

Gardening. Squared. [Part II]

As you can see, I've been very busy since part I of this post. I planted just about one and a half of my new raised beds and everything is settling in nicely. With square foot gardening, instead of rows there are squares. Each square gets its own crop. It's pretty amazing how much you can fit into the box, and because of the box's dimensions (4' x 4' - the average person's reach is 2') there's no need for walking spaces, freeing up every inch for planting.

To figure out how many plants per individual square, just read your seed packet or plant tag. If it says it needs to be spaced 6" apart, you can fit 4 in your 12"x12" square (like strawberries); 4" apart, 9 (like bush beans); 3" apart, 16 (like carrots).

The amount of harvest you can reap from one 4'x4' square foot garden is incredible. From one box, one season can yield (from the book All New Square Foot Gardening):
  • One head of cabbage
  • One head of broccoli
  • One head of cauliflower
  • Four heads of romaine lettuce
  • Four heads of red lettuce
  • Four heads of leaf lettuce, followed by sixteen scallions
  • Four heads of salad lettuce
  • Five pounds of sugar peas
  • Eight bunches of Swiss chard
  • Nine bunches of spinach, then nine turnips
  • Sixteen small, ball carrots
  • Sixteen beets, plus four bunches of beet greens
  • Sixteen long carrots
  • Thirty two radishes
To plant seeds, divide the square into however many parts you need by tracing lines with your fingers. Then use a pen (or your finger) to poke holes about an inch deep in each section. Drop two seeds in each hole, cover with soil, and water. Once your seeds sprout, use scissors to cut off the weakest of the two (sad, I know), leaving one in each space.

To transplant, carefully remove the plant from its container and use scissors to trim off all the excess roots. Use a trowel (small hand shovel) to move a little soil and set plant in. Water well.

So far I've planted marigolds, onion chives, sweet basil, tomatoes, nasturtiums, dwarf sunflowers, jalapenos, bush beans, lemon basil, chili peppers, sugar snap peas, and pineapple sage. That's all in one box. I still have two more boxes to fill and I think we might be doing one completely with strawberries... mmm.

My row garden is also doing well. I have ten heads of romaine lettuce, eight tomatoes, three rows of carrots, two rows of Lincoln peas, three summer squash, about ten sunflowers (I think I might be the most excited about these), and a few rows of corn. I'm interested to see which method works best for my family- row or SFG. Either way, it's my first year of both... so wish me luck!

Next week I'll show you how to build protection for your gardens. That is if I can get my husband to build them for me... haha!

Monday, April 11, 2011

Gardening, Squared. [Part I]

Have you ever heard of Square Foot Gardening? It's a system of gardening invented by Mel Batholomew that promises to grow more veggies in less space with less work than traditional row gardens.

I recently bought his book on Amazon and am totally impressed. Each raised bed is either 2' wide or 4' wide, depending on its placement. If you were to grow something along a fence or wall, you would build a box 2' wide. 4' wide boxes are for those with space to walk around the entire box. The idea is that the average person has a reach of about 2'. The box is then divided into squares. Each square is for a different crop. The growing medium inside the box is a special mix of 1/3 peat moss, 1/3 compost, and 1/3 vermiculite. This mix is soft and friable and full of nutrients. Because of the high amount of compost, there is no need to fertilize. And because you're not using any of the existing soil, the weeds will be at a minimum (the verdict is still out on that... I'll let you know how it goes).

Here's how we got started:

1. First we picked the only spot in our backyard that gets 6-8 hours of sun a day. This spot is at the far back corner, not ideal. If you have a good, sunny spot closer to your back door, use it.

2. Boxes. We used 2"x6" untreated lumber to build our boxes. We built 3 4'x4' boxes, so I bought 6 2x6 boards and had them cut in half (at Home Depot they are 8' long), totaling 12 boards. I also bought some thin wood for the grid on top and had that cut as well. You need 6 4' pieces per box.

Each box is held together with 3 3" wood screws at each corner.

3. Placement. Find your best spot and move your boxes around until you're happy. Make sure to leave at least 3' in between each box for you to walk. After finding the right placement, remove all the existing weeds and grass (or have your husband do it for you). We used a hoe and metal garden rake for this task (yes, WE).

4. Weed cloth. Lay a piece or two of weed cloth under each box to guard off any invaders. This job is easier with a baby cooing in the background.

5. Mel's Mix. This is the name for the growing medium. 1/3 compost, 1/3 peat moss, and 1/3 vermiculite. You can find this at just about any garden center, however you may need to go to a REAL garden center or nursery for the larger packages (this will save you a money).

When selecting your compost, try to get as many different ones you can. Don't get all Black Kow or all mushroom compost, date around.

Peat moss will come in 3.7 cu ft compressed bales, that's what you want. Not the smaller bags.

The vermiculite is sold in 4 cu ft bags. Don't buy the small bags, go big or go home.

For our 3 boxes, we needed a total of 24 cu ft of Mel's Mix. We bought 8 cu ft of compost (each bag will say how many cubic feet it is, if it doesn't, compare it to a bag that does), 7.5 cu ft of peat moss, and 8 cu ft of vermiculite.

We laid it all out on a tarp and mixed and mixed. This tarp thing was the method Mel Bartholomew recommended in his book, however, if I could do it all over, I would pour my components directly into the boxes and mix individually.

Once mixed, shovel a layer at the bottom of your box and use a hose with a soft spray nozzle to wet it down. Do this 3 more times, filling the box.

6. Once filled, build your grid by using a measuring tape or yard stick to mark off each foot and nail or screw in place.

Next week I'll show you how I planted my boxes and what we decided to grow.

Monday, April 4, 2011

What's Zumba?


Have you heard of Zumba? I would be surprised if anyone reading this has not. There is a class in just about every health club, Zumba video games, and even Zumba infomercials. But even with all that, I still didn't *get* Zumba.

"Zumba Fitness is the Latin-inspired dance-fitness program that blends red-hot international music and contagious steps to form a 'fitness-party' that is downright addictive." (Zumba-Fitness)

Okay, so when I first heard this, I was like, "Eh. Sounds like Jazzercise." But it's downright amazing (unlike Jazzercise). In a typical class, you'll dance to about 8 different songs. The moves aren't so much counted as they are just set to the music. When the beat changes, so does the move. And it's not leg lifts or punching the air kind of movies, it's real dance moves that can be modified to fit the person doing them.

Zumba at the YMCA here has a bit of a cult following. All the hardcore "Zumbaritas" where their Zumba outfits complete with Zumba shoes, Zumba bracelets, and even carry their water bottles in their Zumba purses. Then there's me, in my workout pants that are at least 5 years old and my husband's T-shirts. Those "Zumbaritas" are awesome. They know every step and do it perfectly. Then there's me... not so perfect. But you know, I still have fun and I still burn a ton of calories. I tell you all this to emphasis a point, and that is that ANYONE CAN DO ZUMBA. Don't be scared!

My Zumba class is taught by a guy named Kyle. He's the best. He's so good, people wait in line for over an hour to take his class. We start with a good warm-up dance and then progress into the harder stuff. But it's never impossible or dreadful, it's fun... while it's hard. The cool thing about changing your moves as the music changes is that music is ALWAYS changing, so if a move feels especially difficult, there's motivation in knowing that it will change soon. While we dance we sing along and hoot and holler at Kyle while he gets down in front. We end with a cool down and stretches, all set to a beat. The whole thing flows so well, you don't notice the clock. When it's over, you'll be dripping sweat, but I bet you'll be smiling.

Since starting Zumba in January, I've noticed a huge increase in my stamina and endurance. Running is now no where near as difficult as it once was. I've also noticed my own dancing ability getting a lot better... well... at least I'm enjoying dancing around the house with my toddler more than I used to. And the best thing that's happened since I started Zumba....

I've lost 22 pounds.

WOOOOHOOOOO!!!!!

Tell me about your Zumba experiences. Who's tried it?

--------------------------

I just wanted to say thanks for all the responses last week. I read them all and am actually trying a few. Things have been better this week, no crib incidences!

Monday, March 28, 2011

Clueless in Virginia. {Sharing discipling dos and don'ts.}

Last night, after putting Avery to sleep, Emma Kate and I were downstairs playing. I went to do the dishes and EK was left to play on her own. It was suspiciously quiet, so I went looking for her. I found her in the place I least wanted to find her (other than a police station), in her sister's crib. She had let herself in, pulled down all of the dresses framed on her wall (along with the frames), climbed in Avery's crib and was undressing her to put on one of the beautiful dresses. Clearly a better outfit for "pwincess" dreaming.


I just about lost my mind. I was so mad. EK got sent right to bed and I cleaned up the mess, nursed Avery back to sleep, and went back downstairs, fuming.


Fast forward to this morning, it's Avery's nap time and she's resting peacefully in her crib. EK and I are downstairs, playing. I go to get some other things taken care of, leaving her by herself. That same quietness came upon the first floor of our house. I immediately dreaded what was about to happen. I began looking for EK and found her, again, in her sister's crib.


This time I did lose my mind. There was plenty of yelling, and even a little, LITTLE swat on the fanny (the only other time this has happened is when she colored all over the wall in her bedroom). Off she went, to sit in her room and cry while I went downstairs to fume.


After her timeout was over, I called her downstairs, gave her a hug, and we talked about what had happened. She then went to play in her playroom while I cleaned up the kitchen. It got quiet again, so I called her name and began to look for her.


This time I found her, not in her sister's crib, but hiding in the corner, quiet as a mouse. I asked her what she was doing and she said, "hidin'." So I asked her what she was hiding from. Her response,


"Mommy is going to yell at me. It makes me sad."


Talk about a major gut check. I struggled to fight back the tears as I realized my two-year old little girl was scared of me. I'm supposed to be the person she runs to when she's scared, not the person she hides from.

So I'm at a loss. I have no clue how to discipline this child. Timeout doesn't really work anymore, at least not for the big offenses (like sneaking into her sister's room and coloring on the walls), I don't want to spank her, and I hate yelling at her. I've said this a lot, but I want to be the type of mother the General Authorities talk about during General Conference. The mother that "rules in righteousness" and never raises her voice.


But how?


How on earth did those mothers discipline their toddlers?


Now I don't know how this fits in here on this blog, but this is the biggest thing on my mind, as I'm sure is on many of other mothers' minds. I figured I would ask the question here and open up the comments section as a sounding board for everyone to share their experiences with this... the good, the bad, and the ugly.


What methods of discipline and positive reinforcement work in your house?

If you don't have children yet, what methods did your mother use when you were growing up?

Monday, March 21, 2011

Herbs in the Home and Garden


SPRRRRRRRRING!!!

Do you know how much I've been waiting for Spring? It has been a very cold Winter in Virginia for this Florida girl. While I've loved the snow, I've hated the gray. Gray. Gray. Gray. My, that word even looks ugly the more you write it.

But the grey is on its way out, giving way to the beauty that is Virginia Spring. Oh my! The trees are all blooming and the daffodils are popping up everywhere. I can't get enough of them. My phone has about 50 pictures of roadside blooms. All this beauty has inspired me to do something I've always wanted to do, grow an herb and vegetable garden. Thanks to a very talented friend, the vegetable garden is well on its way.

For now, let me show you my new beautiful herbs. These babies sit on the sill of our bay window by our kitchen table.

From left to right, we have Peppermint, Pineapple Sage, Lavender Hidcote, and Curled Parsley. We're very excited to brew our own herbal tea with the Peppermint. Plus it just smells so nice. I have no idea what I'm going to do with the Pineapple Sage, for now I just love to smell it. It has the most sweet pineapple scent. The lavender will get used in potpourris and the curled parsley will get used in just about everything.

My kitchen window makes me smile every time I walk up to the sink. The little herbs are just so cheery to me, and their scent is wonderful. From the left, I have Italian Oregano, Lemon Thyme, standard Thyme, and Spice Island Rosemary.

This is Lemon Thyme. I bought this in Colonial Williamsburg at their old garden (what a treat!). The leaves are slightly variegated and the plant has the cleanest lemon scent. I love how it looks in this yellow pot.

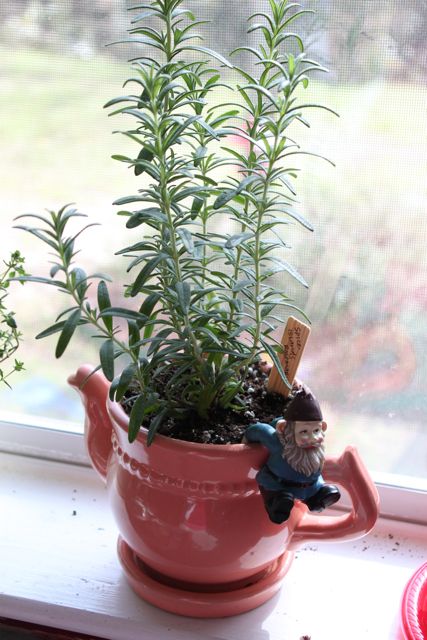
This is Spice Island Rosemary. It's supposed to have a bolder flavor and scent than standard rosemary, but I don't know about that yet, I just bought it because it was pretty. It's also one of my favorites.

There are also herbs outside. From the left I have Garlic Chives, "Hillary's Sweet Lemon" Mint, Tuscan Blue Rosemary, Sage Berggarten, and standard Chives.

Growing herbs is about as easy as growing any kind of garden weed (I'm sure we've all grown plenty of those). These need soil, sun, and water. If you want to really treat them nice, give them a little fertilizer. I've chosen to plant the majority of mine is containers so that I can move them in and out at my pleasing. I'll be planting Sweet Basil and Chamomile in the garden.

Having these herbs around has really been a joy. I hope you give it a try. You can find tons of varieties at your local nursery (the big home centers will have your basics) and will have so much fun collecting your favorites.

Happy Spring!!

Monday, February 28, 2011

Easy as Stir Fry


Stir fry is one of the easiest dishes to make. It's a great solution for a busy week-night meal and can be tailored for anyone's tastes. You can pack it full of lean protein, veggies, and whole grains and smile as you watch your children (and husband who despises "diet" food) eat it up. This is also a great dish for using up stray vegetables or meats before they go bad. Be creative!

Here's one my versions of this yummy dinner:

Ingredients:
1 cup brown rice, uncooked
1 1/2 - 2 cups frozen Italian cut green beans (the wide, flat ones), thawed
1 - 1 1/2 cups shredded carrots
3/4 pound chicken breast or lean steak, cut into thin strips
2/3 cup Teriyaki sauce (I use House of Tsang Korean Teriyaki Stir Fry Sauce)
1 tbsp canola oil

Directions:
1. Use 1/3 cup sauce to marinade meat. Place both in a plastic bag and stash in the fridge until ready to cook.
2. Cook rice according to package directions.
3. When rice has about 10 minutes left, heat skillet over medium-high heat. Using tongs, add the meat to the skillet, leaving excess marinade in the bag. If using chicken, cook until no longer pink. If using steak, just give it a sear on both sides. Remove meat to plate and cover.
4. Add vegetables to pan with 1/3 cup teriyaki sauce and stir to coat. Add about 1/8 cup or so of water to pan and cover. Steam until beans are bright green, about 5 minutes. Return meat to pan.
5. Add cooked rice and stir to coat. Season with salt and pepper to taste.

Monday, February 14, 2011

How to increase your daily intake of fruits and vegetables.


After my last post, a friend emailed wondering how the heck I was eating 7-8 servings of fruits and vegetables each day. It's a great question and a great topic for discussion. Here's my take:

According to Weight Watchers, serving sizes are 1 cup for leafy greens and 1/2 cup for all other vegetables and fruits. That means if you eat one large apple, you've got 2 fruit servings right there. Add to that a handful of baby carrots and a turkey and cheese sandwich on wheat bread (4 thin slices of lean, smoked turkey with one wedge laughing cow cheese on a 100 calorie whole-wheat sandwich round) and you have a 5-point lunch that includes 3 fruits/vegetables servings and you will be FULL.

But that's just an example. The point is to make sure you're getting 1-2 servings of fruits/vegetables (aim for 2) with each meal and then eating additional fruits and veggies for snacks. Smoothies like the Green Monster are also a great way to get your fruits/veggies count up.

Some of my favorites:

Baby carrots (with 1 tbsp low-fat ranch, 0 points)

Apples (For less waste, cut them off the core.)

Clementines (These are great and on sale in a lot of grocery stores right now. They're small and easy to eat.)

Bananas (Right now I'm really loving smoothies with bananas, ice, and 1 cup chocolate almond milk, 3 points.)

Tomatoes (Okay, I don't actually eat these things straight up, but using tomatoes to make sauce for spaghetti or pizza also counts.)

Red Cabbage (This one is new for me. Sneak a handful on tacos or fajitas to add beautiful color and a nice crunch, but don't worry, you can't really taste it.)

Spinach (I sneak this into everything. I've done so so much, I'm starting to think I don't really need to sneak it anymore, it's growing on me.)

Peas (I buy these frozen and steam them in the microwave. I season them with Smart Balance and salt and pepper. I could eat them every night of the week.)

Green Beans (I also buy these frozen and steam in the microwave. These a great vegetable for toddlers because they're easy to pick up with a fork.)

Potatoes (Yes, I count potatoes as a vegetable (as does Weight Watchers). They come from the ground, don't they?)

Fresh Herbs (Is this one a surprise? Herbs like basil and parsley are high in iron and Vitamin C, as well as lots of other goodies.)

These are my family's favorites (for now), what are your favorite fruits and vegetables?

Monday, January 31, 2011

January in review (plus the giveaway WINNER)

At the beginning of this month I shared with you my New Year's Resolutions. Now that the month is over, I can't wait to show you how I've been doing!

One of my resolutions was to lose 50 pounds by 2012. I broke that huge goal into 12 mini-goals: to lose 5 pounds a month. I also made the goal to workout at least 3 times a week.

I'm so happy to report that I have been sticking to my goals and am quite on track. I've been doing Couch to 5k and strength training 3 times a week and Zumba once a week. I've also been strictly following Weight Watchers, tracking all my food and sticking to my points allowance. I've been eating a lot of fruits and vegetables (about 7-8 servings a day) and have eliminated all liquid calories from my diet.

So what did all that get me?

I have a lot more energy and I generally feel better.

Plus...

I've lost 9.5 pounds!!!!

Here's what my month of weight loss and workouts looked like:


On to other business...

Did you try Laughing Cow Cheese yet? Well, a lucky one of you will be trying some soon. Who is it?????


Congratulations, Sarah!!

Sarah said: "Ok, I love your post and am super excited to try laughing cow cheese! I don't have any New Years resolutions...so they are going great!"

Monday, January 24, 2011

Have you laughed today? *giveaway*


Let me tell you about my latest love affair. We met about 3 weeks ago, in the refrigerated aisle of the grocery store. I was looking gorgeous with dried baby spit on my shoulder, yoga pants, and my dirty hair hidden under a Gator hat. My baby was screaming her little chubby head off while my toddler was throwing groceries out of the cart while she tried to figure how to dig herself free. Then suddenly there he was, that beautiful blushed face and earrings called to me. The clouds parted and there was peace. At least for a few seconds.

Who is this new love of mine? The Laughing Cow, of course!

(was it a little too much?)

Have you ever tried Laughing Cow cheese? I did about 3 weeks ago and I think I've had at least 1 wedge everyday since. It comes in several varieties, but my favorites are "Queso Fresco and Chiptole" and "Garlic and Herb." Each wedge is 35 calories and only 1 Weight Watchers Point.

I started out eating it only on whole-grain crackers, but I've branched out and just have to share some of the many ways to use this special little snack.

You can eat the Swiss on apples or pears. Yum!

You can use it on your morning toast instead of butter. I toast a Nature's Own Whole Grain Sandwich Flat (100 calories) and spread some Garlic and Herb on both sides. I then fry up an egg and make a great egg and cheese sandwich.

Last night I made a quick and delicious low-fat Alfredo sauce. Here's how:
Laughing Cow Alfredo Sauce: (serves 4)
1 cup skim milk
1 TBSP Smart Balance
6 wedges Laughing Cow Cheese
1 tbsp grated Parmesan cheese
1 pinch garlic powder
salt and pepper to taste
1 tsp cornstarch dissolved in 2 tbsp cold water (you might not need this)
Combine all ingredients except cornstarch in a small sauce pan and whisk over medium heat until smooth. If it's too thin, add cornstarch. Serve immediately and refrigerate any leftover.

A few nights ago I used it in mashed potatoes. HOLY (laughing) COW!
Laughing Cow Mashed Potatoes: (serves 3-4)
4 red potatoes
4 wedges Laughing Cow cheese (any flavor)
1 tbsp Smart Balance
salt and pepper to taste
Dice up potatoes and boil until fork tender. Drain and return to pot. Mash with your masher (or use a mixer if you don't have a masher) and then add cheese, butter, salt and pepper and mix well.

So you would think by the way this post is going that I have been paid to write it.... I WISH! I really just love this stuff and love that there's something I enjoy eating that doesn't wreck my diet.

I'm so happy that I want to give away a $5 Walmart gift card to one of you so that you can go and buy some Laughing Cow Cheese. To enter this giveaway, just be a follower of this blog and leave a comment telling me how your New Year's resolutions are going. The winner will be chosen at random and announced Monday, January 31.

Good luck!

Monday, January 17, 2011

Spaghetti and Spinach Meatballs


We all know about my quest to get greens into my family's diet. I've been sneaking them into everything! My latest creation is a twist on spaghetti and meatballs that's just as good for you as it is good tasting. And it tastes pretty great. Promise.

Spaghetti and Spinach Meatballs
Serves 8 (9 WW PointsPlus/serving... plus 2 veggie checks)

For the meatballs:
1/2 pound ground pork
1/2 pound ground white-meat turkey
1 package (10 oz) frozen spinach, thawed and squeezed dry
1/4 cup plain dried breadcrumbs
1 egg white
1/2 teaspoon dried oregano
Salt and pepper
Nonstick cooking spray

For the Sauce:
2 teaspoons extra-virgin olive oil
1/2 small yellow onion
2 garlic cloves
1 can (28 oz) crushed tomatoes
1 tsp Italian seasoning
1/2 cup shredded carrots
1/2 cup fresh parsley, chopped
1 pound whole-wheat spaghetti

1. Put oven rack in top position and heat broiler. Place pork, turkey, spinach, breadcrumbs, egg whites, oregano, 1 teaspoon salt, and 1/2 teaspoon pepper in a large bowl. With your hands, mix to combine.

2. Roll into 1" balls (you'll have about 40 or so). I used a small scooper for the uniformity and then rolled them in my hands to smooth them out. Arrange on a prepared baking sheet and lightly coat meatballs with cooking spray.

3. Broil until golden brown, about 10 minutes, rotating halfway through.

4. In a large skillet (I mean large) or heavy pot, heat oil over medium heat. Add onion, garlic, and carrots. Cook, stirring frequently, until onions start to turn translucent, about 6-7 minutes.

5. Meanwhile, add tomatoes to blender or food processor. Once onion mixture is ready, add to blender. Blend, with the cap open a bit, until smooth.

6. Once blended, return to pan and bring to a simmer. Add meatballs and let cook for about 10 minutes. Now's a good time to cook your pasta.

7. Just before serving, add parsley and stir.

8. Add pasta and give it a good toss. If you like your spaghetti on the saucy side, don't cook the full pound.

I hope you enjoy it! Let me know if you give this one a try.

(It should be mentioned that this is my version of a recipe originally found in the January issue of Everyday Food Magazine.)
-----------------------------------------
What we're eating for dinner this week:
Monday: Grilled cheese on whole-wheat with tomato soup
Tuesday: Chicken with brown rice and green beans
Wednesday: Lean Cuisine for me, leftovers for EK
Thursday: Turkey tacos
Friday: Chicken with brown rice and peas
Saturday: Whole-wheat pizza
Sunday: Something TBD from a crock pot


Monday, January 10, 2011

Cranberry and Oat Scones

The diet is going well (down 1.5 this week!), but I still crave pastries and other baked goodies. Here's my version of a recipe I found in this month's issue of Everyday Food for some delicious scones that helped fill that void for me. They're dense like typical scones, not too dry, and very yummy!


Cranberry and Oat Scones
Yields 8; 6 WW PointsPlus each

Ingredients:
3/4 cup all-purpose flour
3/4 cup white whole-wheat flour (or regular whole-wheat will work)
2 teaspoons baking powder
1/2 teaspoon coarse salt
3 tablespoons packed brown sugar
1/2 cup rolled oats
1/2 cup dried cranberries
3 tablespoons unsalted butter, melted
1 large egg, lightly beaten
1 cup buttermilk

Directions:
1. Preheat oven to 400 degrees F. Lightly coat baking sheet with Pam or whatever nonstick spray you use, or line with parchment paper.
2. In a medium bowl, whisk together flours, baking powder, salt, brown sugar, oats, and cranberries. In another bowl, whisk together butter, egg, and buttermilk. Add this to flour mixture and stir just until evenly moistened.
3. Drop batter by 1/3 cupfuls (I like to use an ice cream scoop), 2 inches apart, onto baking sheet. Bake until golden brown, about 12-15 minutes, rotating halfway through.
4. Cook on wire rack. Store in airtight container for up to 2 day, if they last!

---------------------------------

What's for dinner this week:

Monday: Grilled cheese on whole wheat with tomato soup
Tuesday: Lean Cuisine (I love them!)
Wednesday: Whole-wheat spaghetti with turkey meatballs
Thursday: Stirfry with green beans and carrots
Friday: Lemon chicken with brown rice and peas
Saturday: Leftovers
Sunday: Lean Cuisine

Monday, January 3, 2011

New Year, New Goals (part II)

Well, the Holiday season is officially over. I don't know about you, but I'm definitely feeling that post-Holiday depression. Just the thought of beginning to take down my Christmas decorations makes me want to take a nap! So instead of doing all that not-so-fun stuff, I'll blog!

Last week I shared with you my New Year's resolutions. Here they are again:

1) Be a more patient wife and mother.
2) Try harder to give others the benefit of the doubt.
3) Be more charitable.
4) Give more offerings to the church.
5) Institute a permanent Family Home Evening night and stick to it.
6) Be a better friend.
7) Figure out a way to tell my toddler "no" a little less often.
8) Lose this baby weight.
9) Join a gym and go 3 times a week.
10) Try new foods (vegetables).

Now, I realize some of these are a little vague and difficult to measure (Stephen Covey would not approve). I mean, if I ask my husband if he thinks I've been more patient, he had better answer "yes" if he wants dinner. Ha! Just kidding... sort of.

Stephen Covey, in his book The 7 Habits of Highly Effective People, says that "an effective goal focuses primarily on results rather than activity." He goes on to show how to properly write, order and manage goals. Quite frankly, that takes the fun out of it for me, so here's my much briefer version of Covey's goal setting techniques, using my goal to lose weight has an example.

Define the goal. "Losing weight" is not enough information. I need to know what I want to accomplish (how much weight I want to lose), how I'm going to accomplish this, why this is important, when I want it done, and who is going to help me.
What? (What exactly do I want to accomplish?)
I want to be the weight I was before I had kids, therefore I want to lose 50 pounds. (whew! just typing that is hard!)

Why? (Why is accomplishing this important to me?)
I want to be a healthy wife and mother. I want to set a good example for my girls of positive self image and healthy eating. I want to have enough energy to keep up with them. I want to fit into the clothes that fill up my closet.

When? (What is my deadline?)
I want to accomplish this goal by the end of the year.

How? (How am I going to accomplish my goal?)
Join a gym with child care and go at least 3 times a week. Join a group-exercise class. Journal food. Write weekly menu plans. Seek support-tell everyone!

Who? (Who is going to help me?)
My family and friends. All of the SMMWR readers and contributors.
Mini Goals. A big goal needs to be broken up into smaller, bite-size goals to be celebrated. This will keep the morale high and the motivation flowing. My mini goal is to lose at least 5 pounds a month. Suddenly 50 pounds in one year doesn't seem so daunting!

Alright, one down, nine to go! I'm off to organize the rest of my goals. See you next week!

-----------------------------------------

In an effort to keep myself on track, I'll be sharing my weekly meal plans with you. Please feel free to holler at me if I try to sneak by without sharing because that probably means I didn't do it!

What we're eating for dinner this week:
Monday: Stir-fry with beef, snow peas, and carrots.
Tuesday: Parmesan chicken with roasted green beans and potatoes
Wednesday: Spice-rubbed fish with lemony rice and peas
Thursday: Roasted chicken with herb rub and whole-wheat couscous
Friday: Whole-wheat pasta with sriracha marinara and turkey meatballs
Saturday: Homemade whole-wheat pizza
Sunday: Roast beef with potatoes and carrots

Monday, December 27, 2010

New Year, New Goals (part I)

2010 is coming to a close just as quickly as it came. My family has had several life-changing events this year, including my husband's major career change and the birth of our second daughter. I'm very excited to see what 2011 has in store for us!

I've never been one for New Year's resolutions, mainly because I could never see the point. It's not like after the New Year you are magically a different person ready to do the things you couldn't do before. (I guess one thing I could resolve to work on is my cynicism.) But this year I'm going for it. I'm going to treat 2011 like a fresh slate, pretend I AM a different person, and do my best to change some things.

Here's my top ten....

1) Be a more patient wife and mother.
2) Try harder to give others the benefit of the doubt.
3) Be more charitable.
4) Give more offerings to the church.
5) Institute a permanent Family Home Evening night and stick to it.
6) Be a better friend (all of mine will tell you I am horrible at keeping up with them).
7) Figure out a way to tell my toddler "no" a little less often.
8) Lose this baby weight!
9) Join a gym and go 3 times a week.
10) Try new foods (vegetables).

There you have it. My list. Now I need to setup some mini-goals for each of these and some timeframes and I'll be all set. But this is a good start. After all, a goal not written is only a wish.

What are some of your New Year's resolutions?

Monday, December 20, 2010

Because it's Christmas.

In my house, Christmas and cookies are two words that just go together. I don't care how healthy you are, you're going to eat a cookie around Christmas time. Go on and admit it!


Recently I had a Christmas cookie party at my home and challenged all the attendees to a cookie bake off. Here's the winning recipe, and ps... it's a brownie!


Janette's Award-Winning Mint Brownies
(if you're looking for them in the picture, you'll find them in the round tray on the right, above the rectangular tray on the bottom)
Ingredients:
For the brownies:
One box of dark chocolate brownie mix (Janette uses Duncan Hines)
2 eggs
1/3 cup water
1/3 cup vegetable oil
1 tablespoon mint extract
2 tablespoons dutch cocoa powder
1/4 bag milk chocolate chips
1/3 bag white chocolate chips
1/3 bag mint chocolate chips
For the icing:
3 tablespoons butter, melted
1/3 bag white chocolate chips, melted and cooled
1/3 bag mint chocolate chips, melted and cooled
1/3 cup milk
1/2 cup powdered sugar

Directions:
1. Add brownie mix, water, oil, and eggs to a bowl and mix until blended. To this, stir in mint extract, cocoa, and all the chips. Pour batter into greased 9" x 13" pan and bake as directed on box.
2. To make the icing, add the melted butter to a medium sized bowl and stir in all the melted chocolate. Add the milk and powdered sugar and mix until smooth, adding more milk or sugar until you get a good fudge-like consistency. Pour icing over cooled brownies.

Monday, December 13, 2010

A day in the life...


... of me!

I've been saving this post for one of those days when I have no clue what to write about. I loved reading what my fellow contributors' days are like. My day is very different from their days, for instance, I had someone vomit down my back this morning. TMI? Sorry.

6:30-7:00am: Avery's waking up (she typically sleeps 7-7), nurse her and watch the news.

8:00am: Avery's down for her first nap. EK is up by this time, playing in her room waiting for me to go get her.

8:10am: Get EK dressed, teeth brushed, and hair combed.

8:20am: Try to get myself dressed, teeth brushed, and hair combed. If I'm lucky, I'll have time for a shower.

8:40am: Breakfast. EK usually eats a couple whole grain waffles, no syrup or butter, just waffles. Lately I've been mixing up a green monster, EK will usually drink a cup of this with her waffles. We're usually watching cartoons right now, too.

9:00am: Pick up stray toys, vacuum the family room and start a load of laundry.

9:30am: If we're not going anywhere for the morning (like story time or play dates) I'll begin working on "my stuff." I've usually always got some kind of something going on. Right now I'm crocheting and sewing Christmas gifts. I like to get EK working on her own crafts at this time as well. That lasts a few minutes until she's in the play room wreaking havoc.

10:30am: Avery's up. Nurse.

11:00am: Start thinking about what's for lunch. Get EK outside with the dog for some exercise and fresh air.

12:00pm: Lunch. EK eats a lot of PB and J on whole wheat with raisins or apple slices. Lately I've been craving grilled cheese on whole wheat with tomato soup. Mmmmm!

1:00pm: Nurse Avery and put her down for a nap.

1:30pm: EK goes down for her nap.

1:35pm: Sit, breathe, and sit some more.

2:00pm: Start cleaning up the kitchen from lunch and whatever other craziness went on in there.

2:30pm: Pick up the play room, fold clothes.

3:00pm: Avery's up from her nap. Nurse.

3:30pm: Play with Avery, take lots of pictures to fill my hard drive with.

4:00pm: Start thinking about dinner and getting ready for Anthony to come home.

4:30pm: Nurse Avery and put her down for her last nap of the day.

4:45pm: Start cooking dinner.

5:00pm: EK is up from her nap.

5:15pm: Avery's up. Nurse.

5:30pm: Dinner. Last night it was seasoned panko-coated chicken breasts baked in the oven with rice and green beans. Easy, fast, and filling (and good).

6:00pm: Family time... lots of playing going on.

6:30pm: Give Avery a bath and get her ready for bed.

7:00pm: Nurse Avery and put her to sleep.

7:15pm: EK's bedtime business. She gets a bath, her teeth brushed and hair combed, comfy PJs, a story, a song, and family prayer.

8:00pm: EK's in bed.

8:05pm: Relax and watch some TV. Usually Real Housewives on Bravo.

9:00pm: Clean up the kitchen.

9:30pm: Bedtime.

That's pretty much my day. Just sprinkle about 15 dirty diapers in there and it's complete. There's nothing glamorous about it, and it might even seem pretty boring, but I wouldn't give up being a full-time Mom for anything.

Monday, December 6, 2010

Chicken Curry

The temperatures here have really dropped and that means it's time for soups and stews. Curry is something good and hearty, and even loved by toddlers. I adapted this recipe from one out of Martha Stewart's Everyday Food magazine (do you ever read this? It's GREAT!).


Chicken Curry

Ingredients:
2-3 tbsp canola oil
4 chicken breasts (skinless, bone-in or boneless)
Salt and pepper
1 medium yellow onion, finely chopped
2 garlic cloves, minced
1 tsp ground cumin
3 tbsp curry powder
1/2 tsp dried thyme
4 carrots, thinly sliced
1 can (13.5 oz) coconut milk
1 10oz package frozen peas, defrosted
Cooked rice, white or brown, for serving

Directions:
1. Heat oil over medium heat in a large dutch oven or soup pot. Add onion and garlic and cook until translucent. Add cumin, curry, and thyme and cook for about a minute.

2. Season chicken breasts with salt and pepper and add to pot with a 3/4 cup of water. Cover and allow to cook over low heat for about 3o minutes to 1 hour, or until chicken is cooked through. Keep an eye on it so that you don't run out of cooking liquid. Once cooked, shred chicken in pot (I use a wooden spoon and just have at it until it's broken up enough for my taste).

3. Add milk and carrots. Allow to cook partially covered until carrots are tender (the thinner you slice them, the quicker this will go), about 15 minutes.

4. Take off heat and add peas. Season with salt to taste. Serve over rice.

This makes super yummy leftovers, just mix the remaining rice with the remaining curry before storing.