Pages

Showing posts with label Garden. Show all posts

Monday, April 18, 2011

Gardening. Squared. [Part II]

As you can see, I've been very busy since part I of this post. I planted just about one and a half of my new raised beds and everything is settling in nicely. With square foot gardening, instead of rows there are squares. Each square gets its own crop. It's pretty amazing how much you can fit into the box, and because of the box's dimensions (4' x 4' - the average person's reach is 2') there's no need for walking spaces, freeing up every inch for planting.

To figure out how many plants per individual square, just read your seed packet or plant tag. If it says it needs to be spaced 6" apart, you can fit 4 in your 12"x12" square (like strawberries); 4" apart, 9 (like bush beans); 3" apart, 16 (like carrots).

The amount of harvest you can reap from one 4'x4' square foot garden is incredible. From one box, one season can yield (from the book All New Square Foot Gardening):
  • One head of cabbage
  • One head of broccoli
  • One head of cauliflower
  • Four heads of romaine lettuce
  • Four heads of red lettuce
  • Four heads of leaf lettuce, followed by sixteen scallions
  • Four heads of salad lettuce
  • Five pounds of sugar peas
  • Eight bunches of Swiss chard
  • Nine bunches of spinach, then nine turnips
  • Sixteen small, ball carrots
  • Sixteen beets, plus four bunches of beet greens
  • Sixteen long carrots
  • Thirty two radishes
To plant seeds, divide the square into however many parts you need by tracing lines with your fingers. Then use a pen (or your finger) to poke holes about an inch deep in each section. Drop two seeds in each hole, cover with soil, and water. Once your seeds sprout, use scissors to cut off the weakest of the two (sad, I know), leaving one in each space.

To transplant, carefully remove the plant from its container and use scissors to trim off all the excess roots. Use a trowel (small hand shovel) to move a little soil and set plant in. Water well.

So far I've planted marigolds, onion chives, sweet basil, tomatoes, nasturtiums, dwarf sunflowers, jalapenos, bush beans, lemon basil, chili peppers, sugar snap peas, and pineapple sage. That's all in one box. I still have two more boxes to fill and I think we might be doing one completely with strawberries... mmm.

My row garden is also doing well. I have ten heads of romaine lettuce, eight tomatoes, three rows of carrots, two rows of Lincoln peas, three summer squash, about ten sunflowers (I think I might be the most excited about these), and a few rows of corn. I'm interested to see which method works best for my family- row or SFG. Either way, it's my first year of both... so wish me luck!

Next week I'll show you how to build protection for your gardens. That is if I can get my husband to build them for me... haha!

Monday, April 11, 2011

Gardening, Squared. [Part I]

Have you ever heard of Square Foot Gardening? It's a system of gardening invented by Mel Batholomew that promises to grow more veggies in less space with less work than traditional row gardens.

I recently bought his book on Amazon and am totally impressed. Each raised bed is either 2' wide or 4' wide, depending on its placement. If you were to grow something along a fence or wall, you would build a box 2' wide. 4' wide boxes are for those with space to walk around the entire box. The idea is that the average person has a reach of about 2'. The box is then divided into squares. Each square is for a different crop. The growing medium inside the box is a special mix of 1/3 peat moss, 1/3 compost, and 1/3 vermiculite. This mix is soft and friable and full of nutrients. Because of the high amount of compost, there is no need to fertilize. And because you're not using any of the existing soil, the weeds will be at a minimum (the verdict is still out on that... I'll let you know how it goes).

Here's how we got started:

1. First we picked the only spot in our backyard that gets 6-8 hours of sun a day. This spot is at the far back corner, not ideal. If you have a good, sunny spot closer to your back door, use it.

2. Boxes. We used 2"x6" untreated lumber to build our boxes. We built 3 4'x4' boxes, so I bought 6 2x6 boards and had them cut in half (at Home Depot they are 8' long), totaling 12 boards. I also bought some thin wood for the grid on top and had that cut as well. You need 6 4' pieces per box.

Each box is held together with 3 3" wood screws at each corner.

3. Placement. Find your best spot and move your boxes around until you're happy. Make sure to leave at least 3' in between each box for you to walk. After finding the right placement, remove all the existing weeds and grass (or have your husband do it for you). We used a hoe and metal garden rake for this task (yes, WE).

4. Weed cloth. Lay a piece or two of weed cloth under each box to guard off any invaders. This job is easier with a baby cooing in the background.

5. Mel's Mix. This is the name for the growing medium. 1/3 compost, 1/3 peat moss, and 1/3 vermiculite. You can find this at just about any garden center, however you may need to go to a REAL garden center or nursery for the larger packages (this will save you a money).

When selecting your compost, try to get as many different ones you can. Don't get all Black Kow or all mushroom compost, date around.

Peat moss will come in 3.7 cu ft compressed bales, that's what you want. Not the smaller bags.

The vermiculite is sold in 4 cu ft bags. Don't buy the small bags, go big or go home.

For our 3 boxes, we needed a total of 24 cu ft of Mel's Mix. We bought 8 cu ft of compost (each bag will say how many cubic feet it is, if it doesn't, compare it to a bag that does), 7.5 cu ft of peat moss, and 8 cu ft of vermiculite.

We laid it all out on a tarp and mixed and mixed. This tarp thing was the method Mel Bartholomew recommended in his book, however, if I could do it all over, I would pour my components directly into the boxes and mix individually.

Once mixed, shovel a layer at the bottom of your box and use a hose with a soft spray nozzle to wet it down. Do this 3 more times, filling the box.

6. Once filled, build your grid by using a measuring tape or yard stick to mark off each foot and nail or screw in place.

Next week I'll show you how I planted my boxes and what we decided to grow.

Monday, March 21, 2011

Herbs in the Home and Garden


SPRRRRRRRRING!!!

Do you know how much I've been waiting for Spring? It has been a very cold Winter in Virginia for this Florida girl. While I've loved the snow, I've hated the gray. Gray. Gray. Gray. My, that word even looks ugly the more you write it.

But the grey is on its way out, giving way to the beauty that is Virginia Spring. Oh my! The trees are all blooming and the daffodils are popping up everywhere. I can't get enough of them. My phone has about 50 pictures of roadside blooms. All this beauty has inspired me to do something I've always wanted to do, grow an herb and vegetable garden. Thanks to a very talented friend, the vegetable garden is well on its way.

For now, let me show you my new beautiful herbs. These babies sit on the sill of our bay window by our kitchen table.

From left to right, we have Peppermint, Pineapple Sage, Lavender Hidcote, and Curled Parsley. We're very excited to brew our own herbal tea with the Peppermint. Plus it just smells so nice. I have no idea what I'm going to do with the Pineapple Sage, for now I just love to smell it. It has the most sweet pineapple scent. The lavender will get used in potpourris and the curled parsley will get used in just about everything.

My kitchen window makes me smile every time I walk up to the sink. The little herbs are just so cheery to me, and their scent is wonderful. From the left, I have Italian Oregano, Lemon Thyme, standard Thyme, and Spice Island Rosemary.

This is Lemon Thyme. I bought this in Colonial Williamsburg at their old garden (what a treat!). The leaves are slightly variegated and the plant has the cleanest lemon scent. I love how it looks in this yellow pot.

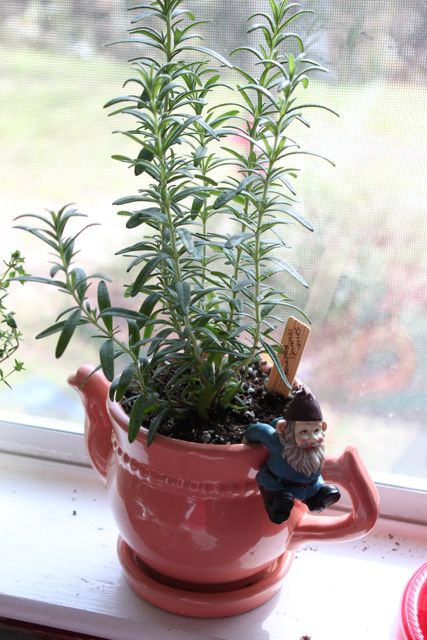
This is Spice Island Rosemary. It's supposed to have a bolder flavor and scent than standard rosemary, but I don't know about that yet, I just bought it because it was pretty. It's also one of my favorites.

There are also herbs outside. From the left I have Garlic Chives, "Hillary's Sweet Lemon" Mint, Tuscan Blue Rosemary, Sage Berggarten, and standard Chives.

Growing herbs is about as easy as growing any kind of garden weed (I'm sure we've all grown plenty of those). These need soil, sun, and water. If you want to really treat them nice, give them a little fertilizer. I've chosen to plant the majority of mine is containers so that I can move them in and out at my pleasing. I'll be planting Sweet Basil and Chamomile in the garden.

Having these herbs around has really been a joy. I hope you give it a try. You can find tons of varieties at your local nursery (the big home centers will have your basics) and will have so much fun collecting your favorites.

Happy Spring!!